| Renders & Downloads | Who is & Info | Links | Home |
|
PART 4, "POSERIZING" |
||||||||||||||||||||||||
|
We're now going to convert our model into a poser character and make all the necessary steps needed to make it sellable.
Assembling your tool box You need Poser4 Pro or newer (I'm using Poser4 Pro. I've tried 6 but I found it clumsy and very slow) but you will also need a couple of other tools that will facilitate your work. A decent text editor. I would recommend "Crimson editor" (www.crimsoneditor.com) - it's free. You can of course get around with any simple text editor but a .cr2 file (we'll be editing such a file) can easily consist of thousands of text rows. Scrolling up and down in such a huge document will certainly give you a headache and you'll likely make mistakes. Use any text editor you wish but I would strongly recommend that you find one with these features (some html editors will do):
A cr2 editor is recommended. If you have a good text editor then you don't need a cr2 editor. A cr2 editor has however a very useful feature - it can collapse / expand the paragraphs in the cr2 file and you can easily see the structure of your cr2 file. The editor also comes in handy when you need to go through the cr2 file and turn on / turn off objects. It can be risky to edit a cr2 file. The size and complexity makes it easy to make a mistake and difficult to locate the mistake. All hand editing should use a copy, not the original file. The safest and most convenient way to edit a cr2 file is with a cr2 editing utility. If you're a mac user then you can ask for cr2 editors in the different poser forums. Here's a couple of editors for windows:
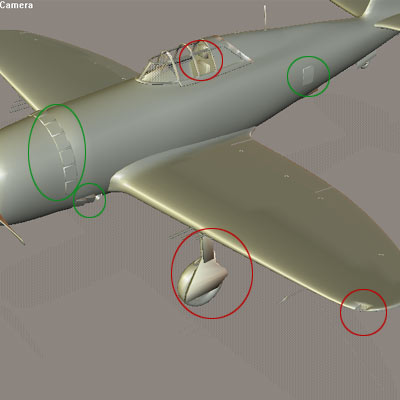
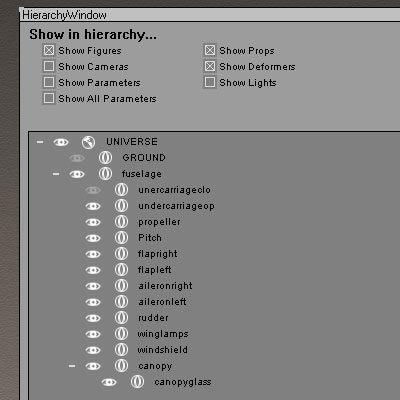
A rsr to/from png converter. This utility is needed to convert rsr files to png and vice versa (poser thumbnails). Some poser versions use rsr (older I think) and some use png. You need to produce both. You can use P3dO Explorer to do the conversion: lcrepiliere.free.fr/softp3doDownload.php Starting tips. Make a new copy of your c4d file for this purpose. Backup your files along the way! Tracking errors in a cr2 file is difficult and it is easy to mess it up completely. Preparing the mesh 1- Connecting / Separating The whole point of rigging the model in poser is to make the different parts movable. Make sure that you have separated all objects that will be movable (flaps, rudder, pitch control, undercarriage etc etc). The glass parts should also be individual meshes. Connect all parts that don't need to be separate objects (connect the fuselage with the wings, tail wing etc). Make sure that your material names are comprehensive (not "Mat.1" but "Glass") because the material names will be used inside poser too. I'm deliberately making it easy for myself - I'm going for a simple solution with one "UndercarriageOpen" and one "UndercarriageClosed" object instead of posing all the undercarriage objects. You can check how my object list looks [HERE]. If you plan to sell your model for 20$ then go for the simple solution. If you plan to make a 100$ product then you should go for a more advanced solution with several parts connected to one control dial (see bottom of this page for more info about that). |
||||||||||||||||||||||||
Tips from Erlik: "You can remove the normals during mapping. Poser doesn't use normals (except to create trouble) and the mesh file will be about 30% smaller. I haven't had problems with ballooned edges. IIRC, you have to uncheck Weld when importing".
Tips from Keith: "I didn't see any mention of Riptide, so I'm not sure if you're using it or not, but it can really simplify life when creating Poser models. When modelling in C4D, use the "Backface Culling" display option and make sure all the polygons are facing the right way (you can turn it off most of the time, but before you export, make sure everything is facing the camera). When you go to export the model, use Riptide's default setting to "Reverse Faces". This flips ALL the normals around so Poser (and C4D) will display them correctly. Instead of scaling your model after importing to Poser, (use Riptide to) import a reference Poser figure into C4D, using a 1000 scale factor. When you're ready to export, just export your plane using that same 1000 scale factor. Use the Riptide "Group Tag" to keep track of your movable part group selection tags... when you export the model, the groups will already be set up. You can also use the Riptide "Region Tag" option to keep track of some selections as UVMapper Regions (these selection tags can span across multiple groups or materials). These regions are just another way of grouping sets of polygons together (for humanoids, you might create "headmapping", "bodymapping", "eyemapping", "mouthmapping" regions, for example, to more easily set up the UV-templates). Obviously these regions are just selection tags in your C4D file, but any tags that are not a material, group or region are lost when you export to .obj, so they can be handy if you need to re-load the .obj into C4D or UVMapper." You can download the Riptide plugin from [here].
Creating bones We need bones to before we can edit joints and we'll let Poser do this work for us. Make sure that the fuselage is selected and then click on the "setup" flap. Click on "pose" to exit the setup room (click ok if you get the message that not all parts have bones assigned to them). Poser has now automatically created the bones. Poser has now renamed "fuselage" to "figure_1_setup". Rename it back to "fuselage". Now open the hierarchy editor again, select the fuselage and click on "create new figure". This will convert the model to a character and the props to body parts. You will be asked to name the set and the character will be saved in the folder "new figures" under "characters" (in the sliding menu to the right). Now close the file you are working with and open a new blank one (File->new). Delete the poser dork and locate the character you just created (characters->new figures). Click on "Create new figure" and the airplane with all the parts should appear.
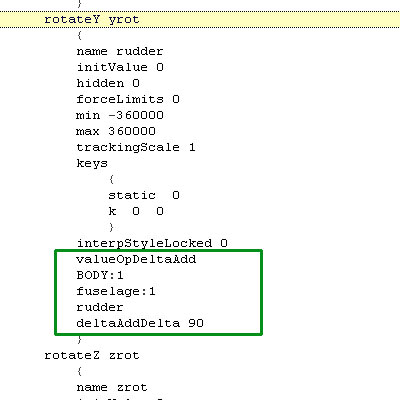
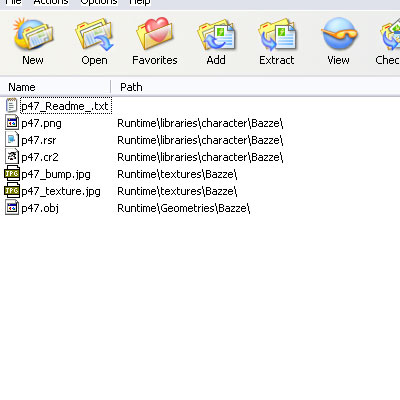
Creating external geometry When we first imported our obj file, Poser understood exactly what file we were working with. But the moment we pressed the Spawn Props button Poser started handling all of the parts' geometry internally (in the cr2 file). We now need to separate the geometry from the cr2 file. Some people do this by manually editing the cr2 file - forget about that hassle. We'll let Poser do it for us by using a little trick. Create your own folder in the poser character folder - I have created one named "Bazze" (Runtime\libraries\character\Bazze). Inside Poser "go" to that folder and click on the plus (+) icon meaning "add to library". This creates a new cr2 file, a png thumb nail _and_ a new obj file in the "Bazze" folder. Poser has automatically extruded the geometry and created a new obj file! The geometry is extruded but it is placed in the wrong folder. Move the obj file to where it should be: Runtime\Geometries\Bazze. Since we have moved the obj file we now need to change the geometry path in the cr2 file. Open the cr2 with your text editor. Change the file path from ":Runtime:libraries:character:Bazze:p47.obj" to ":Runtime:Geometries:Bazze:p47.obj". The file path exists in two places in the cr2 file, just in the beginning and somewhere in the middle. Change it in both places. Make sure that you keep back ups of your cr2 file and that you test your changes along the way.
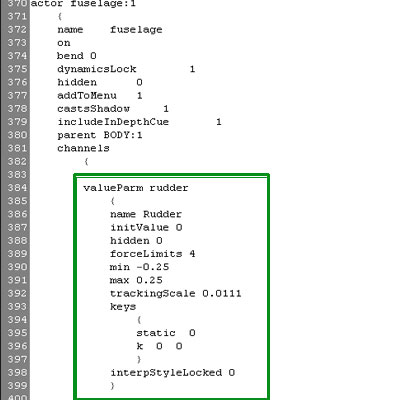
Cleaning up This is also an important step. Hide all objects that the user shouldn't be able to select and move independently. For example hide the wind shield by locating the wind shield actor in the cr2 and change "hidden 0" to "hidden 1". Also hide all the dials that the user shouldn't be able to access. For example the user shouldn't be able to scale the fuselage along the X-axis only (and thereby distorting the model). Locate the fuselage actor and the scaleX channel and change "hidden 0" to "hidden 1". Don't forget to create rsr files from the png files (using P3Do Explorer). The png files (thumbnails) that Poser creates aren't so nice so I usually create my own and replace them.
|