| Renders & Downloads | Who is & Info | Links | Home |
|
Ramjet texturing |
|
This is a walkthrough of the steps I did when texturing the ramjet – it’s pretty basic but works and looks fairly good in the end.
To follow the walkthrough and apply what’s described to you own texture you need to have basic knowledge about how to use layers and how to tweak brushes in Photoshop. You also need to have UV-mapped your model. It is preferred that you have baked an ambient occlusion map but this is optional. |
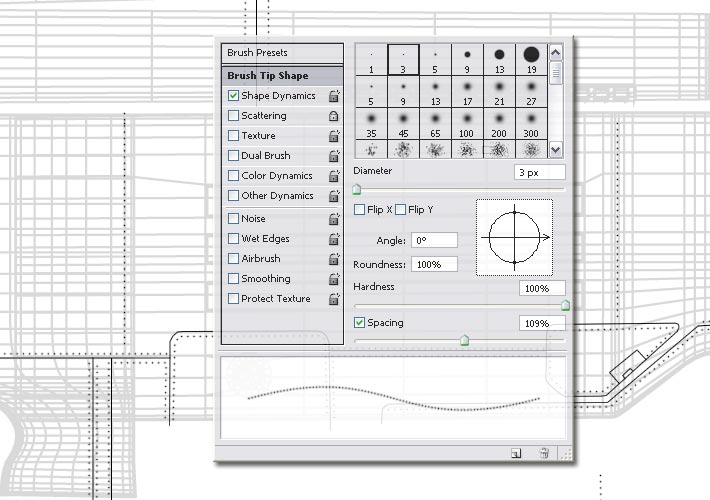
Image 1. I’ve placed the UV map in a separate layer and lowered the opacity quite a bit – it’s barely visible but just enough so that I can see on which part I’m painting. I Prefer to work with thin lines on my UV-map. If you’re using Modo then you can tweak the line width by editing the eps file exported from (open it in a text editor and change the value of the line widht on row 9). If you’re using Cinema4D/Bodypaint3D then you can change the brush size before you outline the UV-map. I like to start out by painting panel lines, hatches etc. In this way I create an overall framework that I easily can follow and reuse. Paint the panel line using a small soft brush in a new layer – name this layer for example "panel_lines_bump". Paint rivets along the panel lines using a custom made brush. Select a small soft brush and adjust the brush’s spacing in the brush tip settings. In this way you will be able to very quickly paint rows with rivets. Paint you rivets in a new layer and name it something like "rivets_bump". The layers "panel_lines_bump" and "rivets_bump" will later be part of the bump and spec maps. 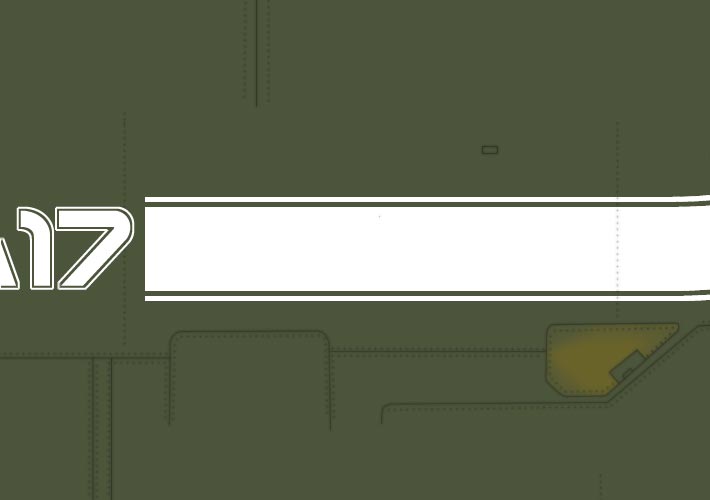
Image 2. In this image I have created a new layer where I paint the basic colors, for example green where the hull will be painted in green/camo, light gray where it will be bare metal etc. Let’s call this layer "base_color". Even on a basic color level parts of a model naturally has color distortions (parts can have been replaced in real life for example). That’s why I tint some panels slightly yellowish/brownish. In this image you can see that I cave tinted the hatch slightly yellow. Create a new layer, "decals" for example, where you paint all kind of stickers, numbers and/or decorative elements (like the white lines in this image). Make a copy of the layers "panel_lines_bump" and "rivets_bump" from the last step. Hide the originals for now and rename the copies to something like "panel_lines_shadow" and "rivets_shadow". Blur them and lower their opacity. This will strengthen the illusion of 3d panel lines and rivets on the model. If you want your rivets to be concave then keep them black. If you wish them to be convex (ie bulging out from the hull) then invert the rivet shadow layer to make them white/bright. 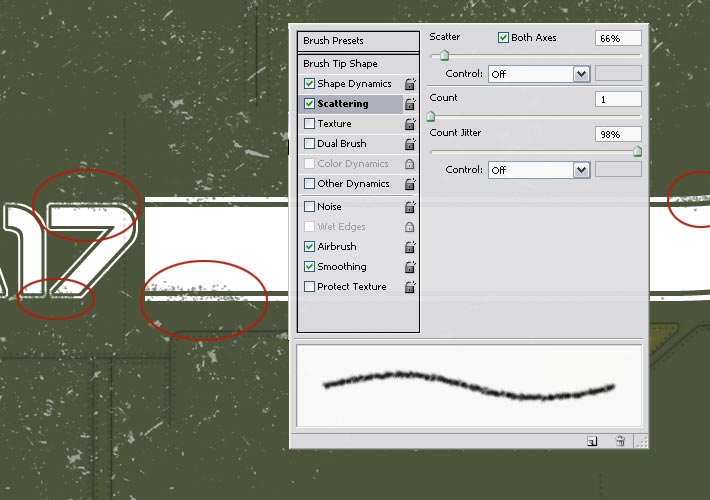
Image 3. In this image I’ve started working on the damage. On top of the basic color layer I’ve created a new layer where I paint those light grey edgy details that you see in this image. Play around with various sizes and make variations in the opacity. Concentrate this kind of damage to areas where the wearing naturally would be located for example around the cockpit and/or at the front side of wings. Exposed areas basically. Name this layer something like "light_chipping". The paint of the decals and decorative parts is also like to wear off. Configure a brush looking like something in this example and using the delete tool chip off some of the white paint like I’ve done in the areas marked with a red circle. 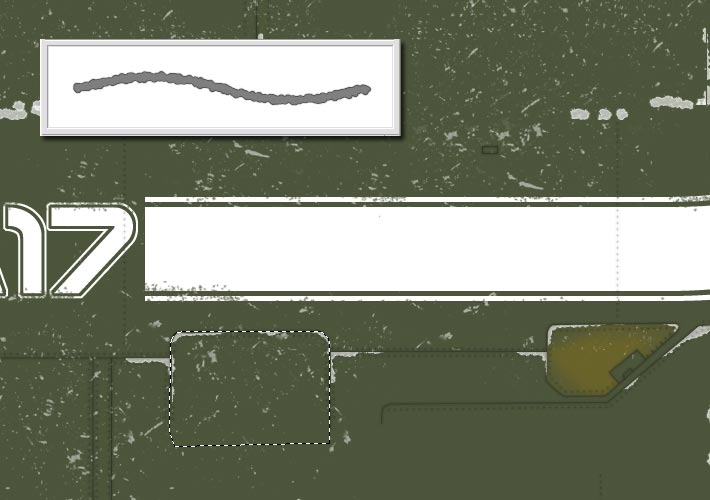
Image 4. In this image I’m working with the paint that chips off along panel lines and at the corners of hatches. To do this create a new layer, "heavy_chipping", and configure a brush like the one in this example. The brush I’ve used is a white, relatively hard one with slight scattering set both to the X and Y axis. Most important is that the brush is set to "wet" which gives it that rim/outline in a 2nd color. By painting with this 2 colored brush you automatically simulate that there is an undercoat painted under the green color of the hull which now is made visible along the edges of the worn of paint. To make the hand painting easier make a selection of the area you wish to chip paint from and paint while the selection is active. In this way you will only paint inside of the selection even if you brush all around the place. 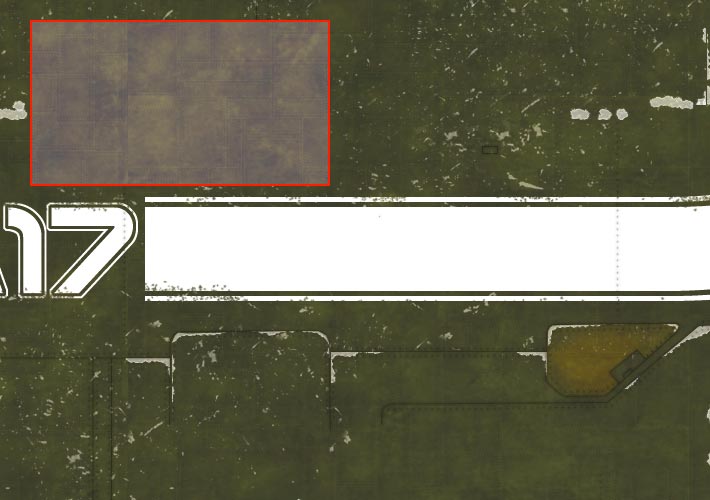
Image 5. The base color is way to boring in itself and needs variation to be believable. An easy way to add variation is to create some kind of generic texture that you can tile across the entire texture and then play with its opacity, blend mode and colors. In this example I have created a tiling texture with small panels, some noise and turbulence. The layer with the tiling texture is put on top of all other layers and set as multiply in the blend mode. Inside the red square you can see how this tiling texture looks in normal blending mode. 
Image 6. Another small detail I use to add is to brighten and/or darken certain areas of the model using a very large soft brush with very low opacity. I lighten the texture where it is likely to be slightly lighter, for example on top of bulging parts. In the same way I darken the texture around engines, exhaust pipes etc or where it just looks too clean. 
Image 7. The bump map is created using layers that I previously already have painted. Here I use "panel_lines_bump" and "rivets_bump" from image 1 and inverted copies of "light_chipping" and "heavy_chipping" from image 3 and 4. The darker the color the deeper the bump. 
Image 8. Creating the specular map is done in a very similar way. By copying the same layers as in the previous image a specular map can be created. By playing around with brightness/darkness of each layer and experimenting with blur and noise various specular effects can be achieved. The brighter the color the stronger the spec. 
Image 9. The last 2 images show a part of the texture without (image 9) and with (image 9b) the baked ambient occlusion map. An ambient occlusion map can be baked and used in the texture or a separate ambient occlusion render pass can be rendered and added in post. If you do both then you have more tweaking options. 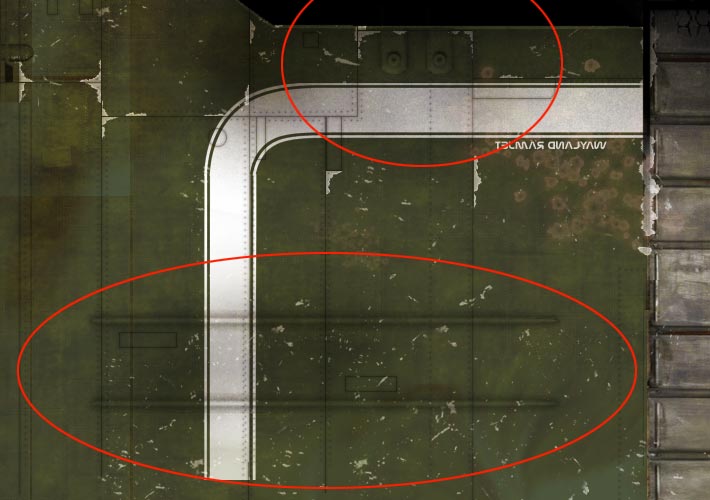
Image 9b. Compare this image with the previous one. In the red circles you can see the additional details the ambient occlusion map provides - it looks dirty and gritty in the right places. |